Garden
How Do You Remove Rust From Garden Tools? Easy Methods That Work
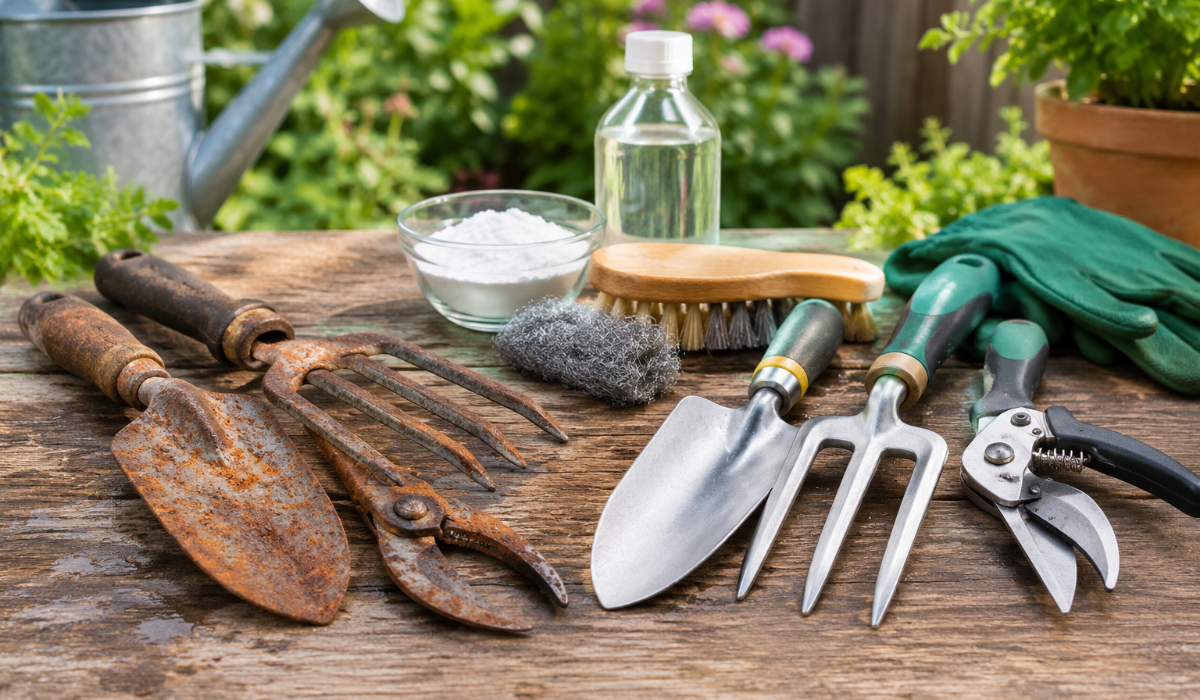
If your favorite shovel, pruning shears, trowel, hoe, or garden fork has developed an orange-brown coating, you may be wondering, how do you remove rust from garden tools without damaging the metal? Fortunately, most surface rust can be removed at home with inexpensive supplies and a little patience. Depending on how severe the corrosion is, you can use steel wool, a wire brush, sandpaper, white vinegar, or a commercial rust remover. The key is to remove the oxidation thoroughly, dry the tool completely, and protect the exposed metal afterward.
Rust forms when iron or steel reacts with moisture and oxygen, which makes garden tools particularly vulnerable because they regularly encounter wet soil, rain, plant sap, fertilizer, and humidity. University extension guidance consistently recommends cleaning tools, removing rust with appropriate abrasives or soaking methods, drying them thoroughly, and applying a protective coating afterward.
This guide explains exactly how do you remove rust from garden tools, from light surface rust to stubborn corrosion. You will also learn which household methods work best, when to use commercial rust removers, what mistakes to avoid, and how to keep your tools rust-free for years.
Key Takeaways
- Light surface rust can often be removed with steel wool, a wire brush, or fine sandpaper.
- White vinegar is useful for moderate to heavy rust because its acidity helps loosen oxidation.
- Do not soak wooden or plastic handles in vinegar or other acidic solutions.
- Always remove dirt, soil, sap, and plant residue before treating rust.
- Dry garden tools completely after washing or rust removal to prevent flash rust.
- Apply a thin protective coating of suitable oil or rust inhibitor after cleaning.
- Sharpen blades only after rust has been removed and the metal has been inspected.
- Severely pitted, cracked, or structurally weakened tools may be safer to replace.
- Store garden tools indoors or in another clean, dry location whenever possible.
- Regular cleaning after use is one of the simplest ways to prevent rust from returning.
What Causes Rust on Garden Tools?
Rust is a form of corrosion that develops when iron-containing metal is exposed to oxygen and moisture. Garden tools are especially susceptible because they are frequently exposed to wet soil, rainwater, dew, plant juices, fertilizers, and humid storage areas. Even a tool that looks clean can retain a thin layer of moisture after gardening, allowing corrosion to develop gradually. Leaving tools outdoors or putting them away while damp can accelerate the problem considerably.
Soil and plant residue can make matters worse because they hold moisture against the metal surface. Fertilizer residues can also be corrosive, which is one reason extension specialists recommend cleaning garden tools regularly rather than waiting until the end of the gardening season.
Common signs of rust
Early rust usually appears as small orange or reddish-brown spots. As corrosion progresses, the surface may become rough, flaky, dark brown, or deeply pitted. Heavy rust can eventually weaken metal components and interfere with moving parts such as pruning-shear pivots.
| Rust Condition | What It Looks Like | Recommended Approach | Difficulty |
| Light surface rust | Small orange spots | Steel wool or fine abrasive pad | Easy |
| Moderate rust | Large brown patches | Wire brush, steel wool, or vinegar | Moderate |
| Heavy rust | Thick flaky oxidation | Vinegar soak or commercial remover plus scrubbing | Moderate |
| Deep pitting | Holes or rough depressions | Assess structural condition carefully | Advanced |
| Severe corrosion | Cracks, weakened metal, broken parts | Replacement may be safest | High |
How Do You Remove Rust From Garden Tools?
The best method depends on the amount of rust and the type of garden tool. For a few small spots, mechanical scrubbing is usually faster than soaking the entire tool. For widespread rust on removable metal components, white vinegar can loosen oxidation before you scrub it away. Commercial rust removers are another option when ordinary household methods are too slow or ineffective.
Before choosing a method, identify whether the rusty section is bare steel, painted metal, stainless steel, or part of a tool with wood, plastic, rubber, or other materials attached. You should treat only the appropriate metal areas, particularly when using an acidic solution. Garden-tool care guidance from extension services recommends removing rust with steel wool, wire brushes, sandpaper, or vinegar depending on the severity.
Basic supplies you may need
- Stiff-bristle brush
- Steel wool
- Wire brush
- Sandpaper
- White vinegar
- Baking soda
- Bucket or plastic container
- Clean rags
- Mild dish soap
- Protective oil or rust inhibitor
- Safety glasses
- Work gloves
Basic rust-removal process
| Step | What to Do | Why It Matters |
| 1 | Remove soil and debris | Exposes the rusty metal |
| 2 | Wash the tool | Removes dirt, sap, and residue |
| 3 | Dry completely | Prevents additional corrosion |
| 4 | Choose a rust-removal method | Matches treatment to rust severity |
| 5 | Scrub or soak | Removes loosened oxidation |
| 6 | Rinse when appropriate | Removes residue from treatment |
| 7 | Dry thoroughly | Prevents flash rust |
| 8 | Apply protective coating | Slows future corrosion |
| 9 | Sharpen blades if needed | Restores cutting performance |
| 10 | Store correctly | Reduces moisture exposure |
The most important part of the process is not simply removing visible rust. You also need to remove residue, dry the metal completely, and create a barrier against moisture. Otherwise, rust can return surprisingly quickly after restoration.
Remove Surface Rust With Steel Wool
For light rust, steel wool is one of the simplest solutions. It gives you enough abrasion to remove oxidation without requiring a chemical soak, provided you use an appropriate grade and reasonable pressure. University gardening guidance specifically recommends coarse steel wool for removing rust from garden tools, while finer grades can be useful for finishing smoother surfaces.
Start by brushing away loose dirt and washing the tool with mild soapy water. Dry it thoroughly, then rub the rusty areas with steel wool using short, controlled strokes. Continue until the orange-brown residue is gone and the underlying metal looks reasonably clean.
Avoid aggressively grinding a thin cutting edge because excessive abrasion can change the shape of the blade. On pruning shears and other precision tools, concentrate on removing corrosion rather than unnecessarily removing sound metal. Afterward, wipe away the dust and apply a thin protective coating.
Best uses for steel wool
Steel wool works especially well on:
- Trowels
- Hand forks
- Small shovels
- Hoe blades
- Pruning-shear surfaces
- Metal handles
- Lightly rusted garden scissors
Use White Vinegar for Stubborn Rust
If you are asking how do you remove rust from garden tools when scrubbing alone is not enough, white vinegar is a popular household option. The acetic acid in vinegar helps loosen rust, making the remaining oxidation easier to scrub away. Extension gardening resources recommend soaking heavily rusted metal tool sections in vinegar for several hours or overnight, depending on the severity.
First, remove as much soil and loose rust as possible. Place only the rusty metal portion into a container of white vinegar, keeping wooden, rubber, and plastic handles out of the liquid. Allow the metal to soak for several hours, checking periodically rather than leaving it unattended for excessively long periods.
After soaking, remove the tool and scrub the loosened rust with steel wool or a wire brush. Rinse the metal appropriately, dry it completely, and apply a protective coating soon afterward. A recent garden-tool maintenance guide similarly recommends limiting vinegar exposure to rusted metal and avoiding prolonged soaking because the acid can eventually affect sound metal as well.
Vinegar rust-removal checklist
- Remove dirt and loose corrosion.
- Protect wood, plastic, and rubber components.
- Submerge only the rusty metal.
- Check the tool periodically.
- Scrub away loosened rust.
- Rinse and dry thoroughly.
- Apply a protective coating.
How long should you soak rusty garden tools in vinegar?
There is no single soaking time that works for every tool. Light rust may loosen within a few hours, while heavier corrosion can require a longer treatment. Several gardening sources recommend anything from a few hours to overnight, with periodic inspection being preferable to automatically leaving the tool submerged for an extended period.
Try a Baking Soda Paste
Baking soda is better suited to light rust and small problem areas than severe corrosion. It is mildly abrasive and can be mixed with water to form a paste that you can work into rusty spots. This approach is particularly convenient when you want a gentle household method without completely submerging a tool.
Mix baking soda with enough water to create a spreadable paste. Apply it directly to the rusty area and allow it to sit for a while before scrubbing with a brush or steel wool. Once the rust has been loosened, wipe or rinse the residue away and dry the tool completely.
Baking soda should not be treated as a magic solution for deeply pitted corrosion. If the rust has penetrated deeply into the surface, mechanical abrasion or a dedicated rust remover will usually be more effective. The goal is to choose the least aggressive method that can reasonably solve the problem.
Use Sandpaper or a Wire Brush
Mechanical rust removal is often the fastest choice for thick, flaky corrosion. A wire brush can break through loose oxidation, while sandpaper helps smooth the remaining surface. The University of Georgia Extension recommends coarse steel wool, pumice, or sandpaper for rust removal as part of broader garden-tool maintenance.
Begin with a coarse abrasive only when necessary. Once the heavy rust has been removed, switch to a finer abrasive to smooth the surface rather than continuing to use a very aggressive tool. This approach reduces unnecessary scratching and helps produce a cleaner finished surface.
Wear gloves and eye protection when brushing or sanding rusty metal. Small pieces of rust and metal can become airborne, especially when you use a wire brush or power-assisted abrasive. Keep the tool secured when working on a blade so that it does not shift unexpectedly.
Mechanical removal comparison
| Tool | Best For | Advantage | Limitation |
| Steel wool | Light to moderate rust | Easy to control | Slow on heavy rust |
| Wire brush | Thick, loose rust | Fast and aggressive | Can scratch metal |
| Sandpaper | Surface rust and finishing | Smooths the surface | Labor intensive |
| Scouring pad | Light rust | Gentle and inexpensive | Limited for deep rust |
| Pumice | Stubborn surface deposits | Useful on larger tools | Requires careful pressure |
Use a Commercial Rust Remover
Sometimes household solutions are simply not enough. A commercial rust remover can be useful when a valuable tool has substantial corrosion or when you need a more predictable treatment. Garden-tool maintenance guidance from UF/IFAS Extension specifically identifies dedicated rust-removal products as an option for neglected tools.
Always read the product label before applying a commercial rust remover. Some products require gloves, eye protection, ventilation, specific dilution ratios, or particular rinsing procedures. Do not assume that a product designed for automotive parts, household hardware, or industrial steel is automatically suitable for every garden tool.
Commercial products can save time, especially when restoring several heavily rusted tools. However, they are not always necessary for ordinary surface rust. For a lightly rusted hand trowel, steel wool may accomplish the job with less preparation and expense.
| Method | Approximate Cost | Best For | Effort | Main Concern |
| Steel wool | Low | Light rust | Low | Requires scrubbing |
| Vinegar | Low | Moderate rust | Moderate | Protect handles |
| Baking soda | Low | Small rust spots | Low | Limited on heavy rust |
| Sandpaper | Low | Surface rust | Moderate | Can scratch metal |
| Commercial remover | Moderate | Heavy rust | Low–Moderate | Follow label directions |
How to Remove Rust From Pruning Shears
Pruning shears require more care than a simple shovel because they have moving parts and precision cutting edges. Before treating rust, remove soil and plant sap from the blades and pivot area. Sap can become sticky and interfere with movement, while corrosion can make the blades drag or prevent them from closing properly.
If the manufacturer allows disassembly, separating the blades can make cleaning easier. For surface rust, steel wool or a fine abrasive pad can often handle the job. For heavier corrosion, a vinegar treatment may work, but keep the handles and non-metal components out of the soak.
After cleaning, inspect the cutting edges carefully. If the blades are dull but structurally sound, sharpen them at their original bevel rather than changing the cutting geometry. Extension guidance emphasizes checking garden-tool blades for cracks, chips, and damage before sharpening.
Important pruning-shear safety tips
- Wear protective gloves when handling blades.
- Keep fingers away from cutting edges.
- Secure the tool when filing or sharpening.
- Do not force a heavily corroded pivot.
- Replace severely damaged blades when appropriate.
- Lubricate moving parts after cleaning.
How to Remove Rust From Shovels, Hoes, and Trowels
Large digging tools are generally easier to restore because their metal surfaces are broad and relatively simple. Start by knocking off dried soil with a stiff brush or putty knife. Wash away remaining dirt and allow the tool to dry before evaluating the rust.
For light rust, scrub the surface with steel wool or a wire brush. For heavier corrosion, you can use a vinegar-soaking method if the tool design allows the rusty metal to be treated without exposing wood or other vulnerable materials. The University of California recommends vinegar soaking for significant rust and then brushing the remaining corrosion away with steel wool or a wire brush.
After removing the rust, inspect the tool for deep pits or cracks. A small amount of cosmetic pitting may not prevent a shovel or hoe from working, but structural damage is a different issue. Once the metal is clean and dry, apply a thin protective coating and store the tool somewhere dry.
How to Treat Rusty Garden Tool Handles
Metal is not the only part of a garden tool that needs attention. Wooden handles can become rough, dry, cracked, or splintered, especially when tools are stored in damp or uncontrolled environments. A good restoration process should therefore address the entire tool rather than focusing only on the rusty metal.
Clean wooden handles gently and allow them to dry completely. Sand rough areas carefully to remove splinters without unnecessarily thinning the handle. Extension guidance recommends treating suitable wooden handles with linseed oil to help preserve the wood and reduce drying and cracking.
Do not immerse wooden handles in vinegar or other rust-removal solutions. Acidic soaking can damage the wood and may loosen the connection between the handle and the metal head. Instead, isolate the metal portion and clean the handle separately.
How Do You Remove Rust From Garden Tools Without Damaging Them?
The safest answer is to start with the least aggressive method that matches the rust. If you have a few orange spots, begin with steel wool or a gentle abrasive instead of immediately using a strong chemical treatment. If the rust is widespread, a controlled vinegar soak or suitable commercial remover may save time.
Protecting the tool’s geometry is particularly important for blades. Aggressive grinding can remove sound metal, alter a cutting edge, or create scratches that later become new corrosion points. Wisconsin horticultural guidance also cautions that some abrasive materials can leave scratches where rust may redevelop, so use abrasives thoughtfully.
Rust-removal decision guide
| Situation | Best Starting Method | Next Step |
| A few orange spots | Steel wool | Apply protective oil |
| Moderate surface rust | Wire brush or steel wool | Fine abrasive finish |
| Heavy surface rust | Vinegar soak | Scrub and rinse |
| Deep rust | Commercial remover | Inspect for pitting |
| Rust around moving parts | Controlled scrubbing and lubrication | Service or replace parts |
| Cracked or severely weakened metal | Do not rely on cleaning | Consider replacement |
How to Prevent Garden Tools From Rusting
Knowing how do you remove rust from garden tools is useful, but preventing corrosion is even better. The most effective strategy is surprisingly simple: clean the tool, dry it, protect the metal, and store it somewhere dry. Extension horticulture programs consistently emphasize cleaning and drying tools after use and keeping them away from moisture during storage.
Do not leave tools lying on wet soil overnight. Even a few hours of moisture exposure can contribute to corrosion, especially when the tool already has scratches or damaged protective coatings. After gardening, remove soil, wash stubborn residue when necessary, and wipe the tool dry before putting it away.
A thin protective coating can provide an additional moisture barrier. Depending on the tool and intended use, gardeners may use appropriate mineral or plant-based oils, manufacturer-approved lubricants, or dedicated rust inhibitors. Some extension guidance recommends plant-based oil for garden tools and cautions against petroleum-based products where soil contamination is a concern.
Garden tool maintenance checklist
| Maintenance Task | After Each Use | Monthly | Before Storage |
| Remove soil | ✓ | ✓ | |
| Remove sap | ✓ | ✓ | ✓ |
| Dry metal | ✓ | ✓ | ✓ |
| Inspect for rust | ✓ | ✓ | |
| Lubricate moving parts | ✓ | ✓ | |
| Sharpen blades | As needed | ✓ | |
| Treat wooden handles | ✓ | ||
| Check for cracks | ✓ | ✓ | |
| Store indoors/dry | ✓ | ✓ | ✓ |
Try an oiled-sand maintenance bucket
Some gardeners use a bucket containing sand and a suitable oil to help clean and maintain metal tools. The abrasive sand can help loosen soil and surface residue, while the oil provides a protective coating. Texas A&M garden-tool guidance describes this type of cleaning bucket as one possible maintenance technique.
However, choose the oil carefully if tools will contact soil or food crops. A plant-compatible oil may be preferable in those situations, and you should follow the recommendations appropriate for your garden. The goal is not to saturate the tool but to leave a light protective film.
Common Rust-Removal Mistakes
One of the biggest mistakes is treating rust before removing dirt and plant residue. Soil can hide corrosion and prevent a rust-removal treatment from contacting the metal evenly. Cleaning first makes every subsequent step more effective.
Another common error is leaving tools wet after treatment. Washing or rinsing a tool without immediately drying it can create the exact moisture conditions that caused the rust in the first place. Garden-tool guidance repeatedly stresses thorough drying before storage.
A third mistake is soaking the entire tool when only the metal needs treatment. Wooden handles, rubber grips, plastic components, and certain coatings can be damaged by prolonged exposure to acidic solutions. Whenever possible, isolate the affected metal rather than immersing the whole tool.
Mistakes to avoid
- Do not store wet tools.
- Do not soak wooden handles in vinegar.
- Do not leave vinegar on metal indefinitely.
- Do not use excessive force on thin blades.
- Do not ignore deep cracks or structural damage.
- Do not sharpen a blade before removing heavy corrosion.
- Do not leave rust-removal residue on the metal.
- Do not skip the protective coating afterward.
- Do not use an unfamiliar chemical without reading its label.
- Do not assume every rusty tool is worth restoring.
When Should You Replace a Rusty Garden Tool?
Not every rusty tool needs to be thrown away. Surface rust is usually a maintenance problem rather than a reason for replacement, especially when the underlying metal remains strong and functional. A quality shovel, hoe, hand fork, or pair of shears can often be restored successfully after years of neglect.
Replacement becomes more sensible when corrosion has significantly weakened the metal. Deep pits, cracks, distorted blades, broken pivots, or structural failures can create safety and performance problems. If a cutting tool can no longer maintain a stable edge or a digging tool has become dangerously thin, restoration may not be worth the risk.
| Condition | Restore? | Reason |
| Minor orange surface rust | Yes | Easy to remove |
| Moderate flaky rust | Usually | Metal may remain sound |
| Deep cosmetic pitting | Sometimes | Depends on tool strength |
| Cracked blade | Usually no | Structural safety issue |
| Severely weakened metal | No | Reliability is compromised |
| Replaceable rusty blade | Often | Replace component instead |
| Valuable vintage tool | Usually | Restoration may be worthwhile |
Expert Tips for Long-Lasting Garden Tools
The best approach to how do you remove rust from garden tools is to think beyond the immediate cleaning job. Rust removal restores the surface, but maintenance determines whether that surface stays clean. A tool that is cleaned, dried, lubricated, sharpened appropriately, and stored correctly will generally require far less restoration over time.
Clean tools before rust becomes visible
You do not have to wait for orange spots to appear before maintaining your tools. Soil, fertilizer, sap, and moisture can all contribute to deterioration. A quick cleaning after gardening takes much less effort than a full rust-removal session later.
Dry before applying protection
Oil or rust inhibitor works best when applied to clean, dry metal. Trapping moisture beneath a protective coating defeats the purpose of the treatment. Wipe the tool carefully and check joints, crevices, and blade edges before storage.
Protect cutting edges
Pruning shears, loppers, knives, and other cutting tools need special attention. Keep the bevel intact and avoid aggressive grinding when removing rust. After cleaning and drying, lubricate moving components according to the tool manufacturer’s recommendations.
Inspect handles at the same time
Rust removal is an ideal opportunity to check wooden handles for splinters, cracks, and loose connections. A tool with a deteriorating handle can be unsafe even if its metal head looks perfect. Sand rough wood and maintain suitable handles with an appropriate protective treatment.
Store tools off damp floors
A clean storage area can make a major difference. Hang long-handled tools when practical, keep small tools organized, and avoid leaving metal directly on damp concrete or soil. Indoor or covered storage reduces exposure to rain, dew, and humidity.
A Simple Routine for Rust-Free Garden Tools
A practical routine does not need to take more than a few minutes after ordinary gardening. First, knock soil from the tool and rinse it when necessary. Then dry the metal thoroughly and inspect for early rust, damaged edges, loose handles, or sticky moving parts.
If you notice a small rust spot, remove it immediately with steel wool or another suitable abrasive. If the rust has spread across a larger area, schedule a more thorough vinegar soak or use a suitable commercial rust remover. Finish by drying the tool and applying a light protective coating.
This routine is much easier than restoring neglected equipment once corrosion has become severe. It also keeps garden tools performing better because clean blades cut more efficiently and clean digging tools move through soil with less friction. Properly maintained tools can remain useful for many seasons, making routine care a worthwhile investment.
Conclusion
If you have been wondering how do you remove rust from garden tools, the good news is that most surface and moderate rust can be handled with simple household supplies and the right technique. Start by removing dirt, sap, and debris, then choose a method based on the severity of the corrosion. Steel wool and wire brushes work well for surface rust, while white vinegar can loosen more stubborn oxidation before scrubbing, and commercial rust removers can help with particularly difficult cases.
The restoration process does not end when the orange residue disappears. Rinse or clean the metal appropriately, dry it completely, inspect the tool for damage, and apply a suitable protective coating. Wooden handles should be maintained separately, and blades should be sharpened only after the metal has been cleaned and inspected.
Ultimately, the best solution to how do you remove rust from garden tools is prevention. Clean your tools regularly, never store them wet, protect exposed metal, and keep your equipment in a dry storage area. A few minutes of maintenance after gardening can prevent hours of rust removal later and help your favorite tools remain safe, sharp, and dependable.
Frequently Asked Questions
How do you remove rust from garden tools quickly?
For light rust, scrub the affected area with steel wool or a wire brush. For heavier rust, soaking the metal portion in white vinegar for several hours can loosen the corrosion before scrubbing. Always dry the tool completely afterward and protect the clean metal.
Does vinegar really remove rust from garden tools?
Yes, white vinegar can help loosen rust because it contains acetic acid. It is particularly useful for moderate surface corrosion when mechanical scrubbing alone is not enough. Keep wooden and plastic components out of the vinegar and avoid unnecessarily long soaking.
What is the easiest way to remove rust from garden tools?
Steel wool is usually the easiest option for small patches of surface rust. It requires little preparation and gives you good control over how much material you remove. For widespread rust, vinegar or a commercial rust remover may be more efficient.
Can baking soda remove rust from garden tools?
Baking soda can help with small areas of light rust when mixed with water into a paste. Apply it to the affected area, scrub gently, and clean and dry the tool afterward. It is generally less effective than a dedicated rust treatment for heavy corrosion.
Should you use WD-40 on rusty garden tools?
A suitable light lubricant can help clean and protect metal surfaces, and extension gardening resources recommend light machine oil or similar products for tool maintenance. However, the product should be appropriate for the tool’s intended use, particularly when the metal will contact soil or edible crops. Always follow the product label and wipe away excess.